
Quick Heal Total Security is simple to install and easy to use. During installation, read each installation screen carefully and follow the instructions.
Prerequisites
Remember the following guidelines before installing Quick Heal Total Security on your machine:
- A system with multiple anti-virus software programs installed may result in system malfunction. If any other anti-virus software program is installed on your system, you need to remove it before proceeding with the installation of Quick Heal Total Security.
- Close all open programs before proceeding with installation.
- We recommend you to keep a backup of your data in case your system is infected with viruses.
- Quick Heal Total Security must be installed with administrative rights.
System Requirements
To use Quick Heal Total Security, your system should meet the following minimum requirements:
- Mac OS X 10.9, 10.10, 10.11 & macOS 10.12, 10.13, 10.14, 10.15, 11, 12, 13, 14, 15 and 26
- Processor: Intel core or Apple's M1, M2, M3, M4 chip compatible
- 512 MB of RAM
- 417 MB free hard disk space
- Internet connection to receive updates
The requirement is applicable only to 64-bit operating systems unless specifically mentioned.
The requirement is applicable to all flavors of the operating system.
The requirements provided are minimum system requirements. Quick Heal recommends your system has higher configuration than the minimum requirements to obtain best results.
To check for the latest system requirements, visit: www.quickheal.com.
Clients that support email scan
The POP3 email clients that support the email scanning feature are as follows:
- Apple Mail Ver. 10.3 and later
- Thunder bird
- Sparrow
- Sea Monkey
- MailSmith
Clients that do not support email scan
The POP3 email clients and network protocols that do not support the email scanning feature are as follows:
- IMAP
- AOL
- POP3s with Secure Sockets Layer (SSL)
- Web based email such as Hotmail and Yahoo! Mail
- Lotus Notes
SSL connections not supported
Email Protection does not support encrypted email connections that use Secure Sockets Layer (SSL). If SSL connections are being used, the emails are not protected by Email Protection.
Installing Quick Heal Total Security
To install Quick Heal Total Security on your machine, follow these steps:
- Insert the installation CD/DVD in the drive.
A window with the installer and uninstaller packages appears.
In case, the installer does not appear, search for the disk image on your desktop and open it. Download or copy the installation file (Quick Heal Total Security.dmg) to your desktop, and then open it.
- To launch the installer, click Quick Heal Total Security.pkg.
The user acceptance agreement screen appears.
macOS Catalina and later versions ask permission to access DMG folder location that requires users approval to run installer. However, the user interface of different versions may differ slightly.
- Click Continue .
- On the Welcome screen, click Continue.
The ReadMe file appears. You are expected to read the Read Me file in its entirety.
- Click Continue.
- The End-User License Agreement screen appears. Read the agreement carefully.
- Click Continue.
- Click Agree to proceed with the installation.
- To initiate the installation, click Install .
Quick Heal Total Security is set to be installed on your machine at the fixed location.
Moreover, you cannot change the location while installing the software.
- Provide your user credentials when prompted.
Quick Heal Total Security installation process starts.
Follow these steps to ensure that Quick Heal Total Security is compatible with macOS Catalina and later. For other macOS, go to step 10 directly.
Note: While installing Quick Heal Total Security v3.2 build on macOS Catalina and later, the following warning message appears.

i. To continue for installation, click OK.
To allow the permission whenever a message appears, click OK. These permissions will ensure that the require settings are done. However, you must check the security settings carefully.
macOS Catalina
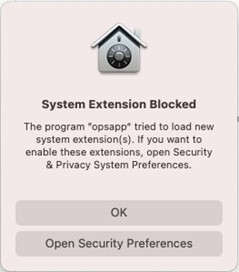
For the Mac computers with macOS Catalina, the following system extension prompts appear.
Message for Online Protection (Opsext)
macOS Big Sur and later
For the Mac computers with macOS Big Sur and later , the following system extension prompts appear.
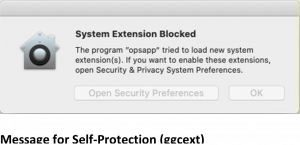
Message for Self-Protection (ggcext)
Message for Online Protection (Opsext)
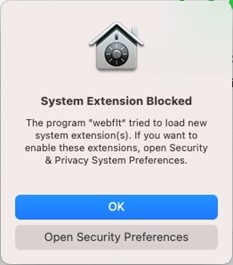
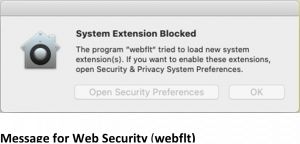
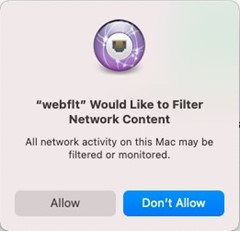
Message for Web Security (webflt)
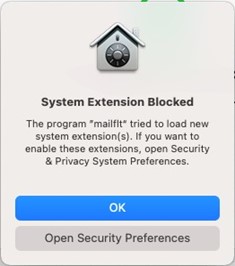
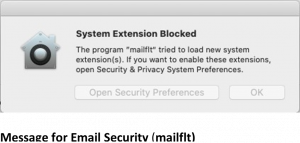
Message for Email Security (mailflt)
On macOS Catalina to macOS Sonoma, user needs to ALLOW all the above shown system extension prompts to ensure the following settings.
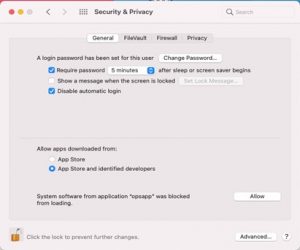
i. Go to System Preferences > Security & Privacy .
ii. Click the lock icon and provide the password if it is locked.
iii. Click the ALLOW button available next to the message ‘System software from application “app name” was blocked from loading’ as shown in the following screenshot.
Allowing System Extension Prompts on macOS Sequoia
To configure system extensions on macOS Sequoia and later, follow these steps to enable both Endpoint Security Extensions and Network Extensions:
- Endpoint Security Extensions
-
a) Navigate to System Settings > General > Login Items & Extensions.
- b) Click info icon next to Endpoint Security Extensions.
For Tahoe users: Select By Category, then proceed to Endpoint Security Extensions.
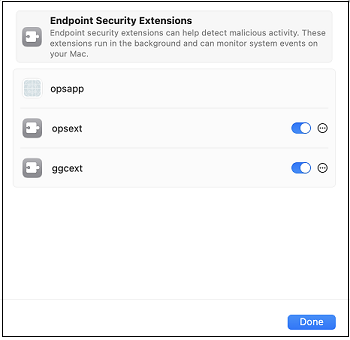
- c) In the Endpoint Security Extensions section, individually enable the following extensions: opsext, and ggcext.
- d) Click Done.
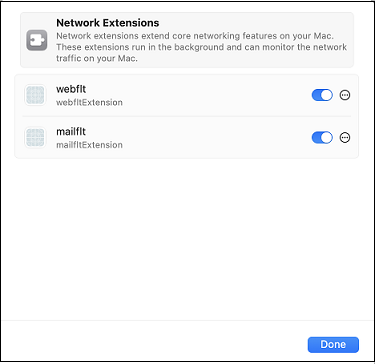
- Network Extensions
-
a) Navigate to System Settings > General > Login Items & Extensions.
- b) Click info icon next to ‘Network Extensions.’
For Tahoe users: Select By Category, then proceed to Network Extensions.
- c) In the Endpoint Security Extensions section, individually enable the following extensions: webflt and mailflt.
- d) Click Done.
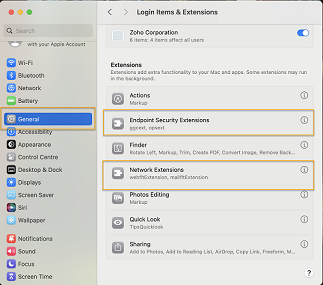
Login Items & Extensions
Endpoint Security Extensions
Network Extensions
Requires Permission to make Quick Heal Total Security Compatible with macOS Catalina 10.15 and later version
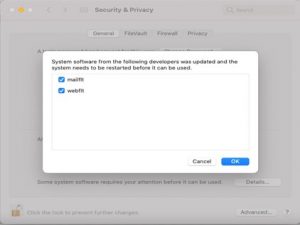
Apps and Services of Quick Heal require permission to access system files on macOS Catalina and macOS Big Sur. After allowing all the Apps and Services, restart your computer.
After Quick Heal Total Security is installed successfully, the following prompts appear.
macOS Catalina
For the Mac computers with macOS Catalina, the following system extension prompts appear.
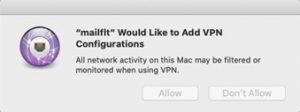
Email Security VPN Configurations
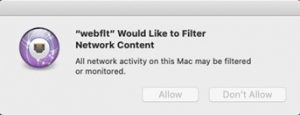
Web Security Network Content macOS
Big Sur to macOS Sonoma
For the Mac computers with macOS Big Sur to macOS Sonoma , the following system extension prompts appear.
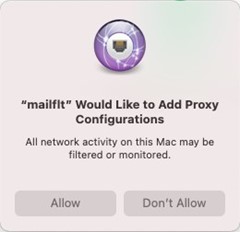
Email Security VPN Configurations
Web Security Network Content
Message from Quick Heal
The following message appears.
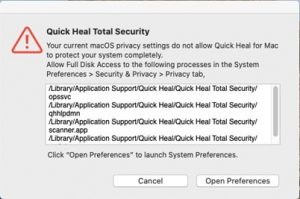
i. To make Quick Heal Total Security compatible with macOS Catalina and later, ensure the following settings on macOS.
- Open System Preferences.
- Go to the Security & Privacy > Privacy tab.
- Click the lock icon and provide the password if it is locked.
- Select Full Disk Access in the left pane.
ii. Add the following processes on the given paths and then select the processes on the Security & Privacy Full Disk Access window:
- /Library/Application Support/Quick Heal/Quick Heal Total Security/opssvc
- /Library/Application Support/Quick Heal/Quick Heal Total Security/qhhlpdmn
- /Library/Application Support/Quick Heal/Quick Heal Total Security/scanner.app
- /Library/Application Support/Quick Heal/Quick Heal Total Security/update.app
- opsext (already present in the privacy section)
- ggcext (already present in the privacy section)
The following screenshot displays Full Disk Access configuration in System Preferences.
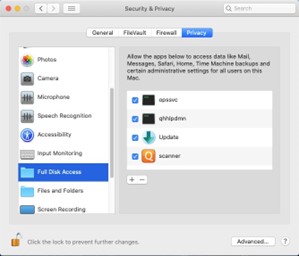
Full Disk Access
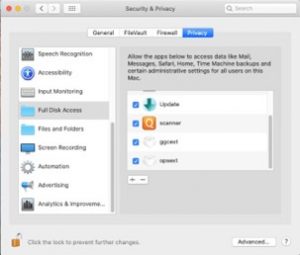
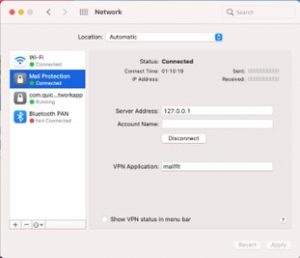
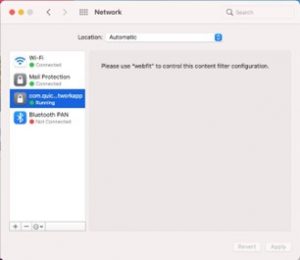
The following screenshot displays mailflt & webflt network extensions in connected state in System preferences > Network.
After all the System extensions are Allowed and required permissions are given, restart your computer.
- To initiate the activation process, click Register Now.
- Click Register Later or Continue to perform activation later.
- On Summary page, click Close to close the installer window.
Uninstalling Quick Heal Total Security
Uninstalling Quick Heal Total Security exposes your system and your valuable data to virus threats. However, in case you need to uninstall Quick Heal Total Security, follow these steps:
- Double-click the ‘Quick Heal Un-installer’ kept inside the application folder or insert the installation CD/DVD in the drive and click Quick Heal Un-installer.app.
A window with the installer and uninstaller packages appears.
In case it does not appear, search for the disk image on your desktop and open it. Download or copy the installation file (Quick Heal Total Security.dmg) to your desktop, then open it.
Follow the instructions on the uninstallation wizard.
- On the Welcome screen, click Yes.
- Enter your password credentials and click OK.
You are prompted for credentials only if the Password Protection is enabled for Quick Heal Total Security.
Quick Heal Total Security maintains a repository of Report Files, Quarantine Files, Backup Files, Black list email address and White list email address. You may retain or delete this repository during uninstallation. However, the Remove Report Files, Remove Quarantine/Backup Files and Remove list of black-list & white-list email senders options are selected by default.
- To continue with uninstallation without saving the repository, click Next. If you want to retain the repository, deselect the options to the respective repositories and click Next.
- Provide your user credentials.
The uninstallation process starts.
To unload Quick Heal product app extensions on macOS Catalina and later “opsapp”, “mailflt” & “webflt”, you must provide your credentials.
Upon completion, a message Quick Heal Total Security has been successfully un-installed appears. You can provide your feedback and reasons for uninstalling Quick Heal Total Security by clicking Write to us the reason of un-installing Quick Heal Total Security. Your feedback helps us improve the product quality.
Please note the product key for future reference. You can copy the product key by clicking Copy to pasteboard also. You can also open a document and directly paste this information into the document. Restart is recommended after uninstallation. To restart click Restart Now , or click Restart Later to continue working on your PC and restart after some time.